Showing posts with label craft. Show all posts

Monday, March 26, 2012

Crochet School

Sorry for my lack of posting lately. I have had a few things thrown at me and I wasn't able to keep up with everything! so so sorry. I wanted to share something with you all.

Do you know how to crochet? No? Then you MUST go to Craftyminx she has 23 lessons to teach you how. I have only finished the first 9 lesson and check out my progress.
Not too shabby for only doing one project before this I think...

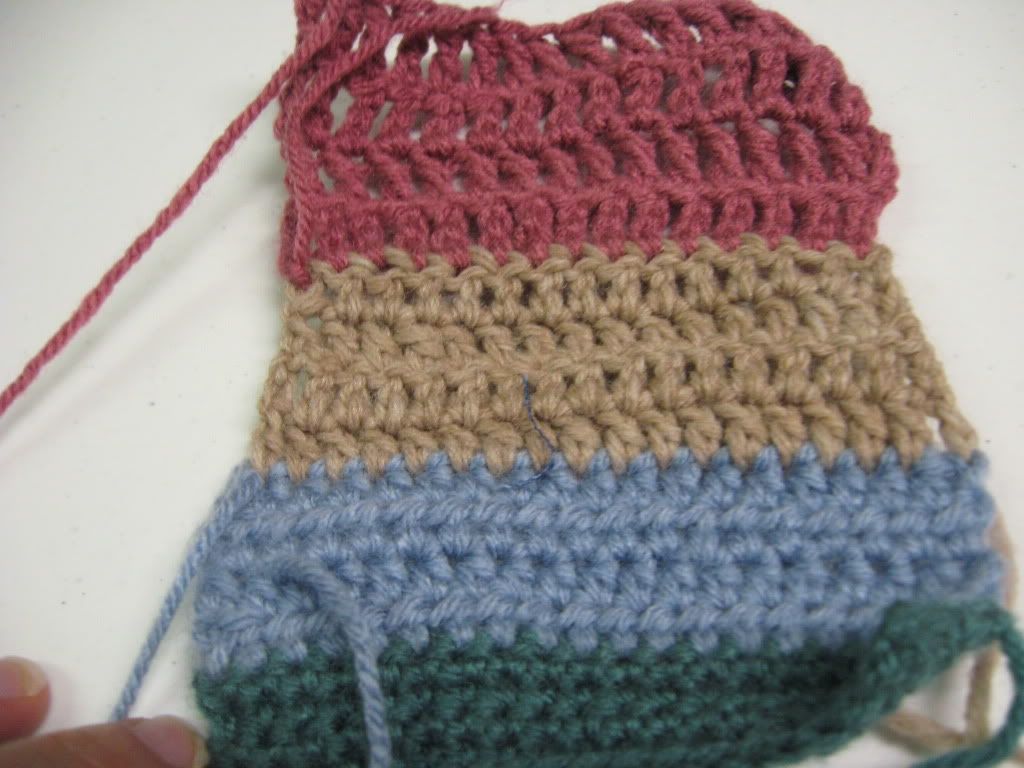
She teaches all the ins and outs of crocheting, and has video tutorials for both left and right hand-ers!. I have absolutely enjoyed learning it. I have done crocheting before but only an Afghan with granny squares. My mom showed me how to do it and I copied. Not much learning involved there! So I want to thank Dana for providing and doing the work with this! Also there is word that she is working on a knitting school. I hope she can get that going soon, wouldn't mind adding that to my talents.  :)

Next week I'll be getting back to my Organize my Life segment. I just haven't been feeling it. With the sun out I wanted to be outside not indoors cleaning! I'll be working on the game closet next. We just got 150 dollars worth of new games or expansions. If you live close come play!

Monday, March 19, 2012

Flower Lace Headhand

The sweetest family let me go through their Mother's home after she passed and was able to grab whatever I wanted. Their mother was into crafts and decorating so I went home twice with a full car. So grateful for that opportunity, especially since I am a wife of a grad student and therefore poor.

She had a basket of lace that I took and have been trying to find projects to use it for. This lace was the first one I fell in love with and wanted it to be something I would use a lot.


Pretty flowers right? so I made it into this
I used fabric stiffener to make the flowers form to my liking. I used one of our large balls to have it dry on. Then sewed on the elastic at the back. I love how it turned out!

 I wore it for the first time on Saturday for St. Patrick's. When my son Austin saw it he was envious, and asked if he could have flowers in his hair too. I search and found a little strand of it for him. He was so happy to get them and very concerned about losing them. It was quite windy. I really wonder how many people thought I had a little girl and not a boy wearing pink flowers....


Monday, March 12, 2012

Hanging Fun


Like the plaques I got? I purchased theses at Hobby Lobby for 60 cents each! Can't help but love their 80% off section. I am not a coffee or tea fan but those were only held on by small screws, so I removed them easily. I will be doing something with those some day, I keep ya informed.

After taking the coffee and tea off I primed and painted them. Put on cute scrapbook paper. (I have no idea why there is a fork in the picture!)
Grab hammer and nails and choose your spot. These ones are for the boys.

To put their bags and hats on them. They were so excited about it when they saw it. Has anything been put on them since? No. All well I'll get them trained yet!

This one is for me! For keeping my necklaces untangled. I don't have very many of them so this works for me. I've also seen putting on little hooks on the bottom side of a canvas, like HERE, if you need more space and hooks for your jewelry.

Monday, March 5, 2012

Framed T-shirt Pom Poms

Once again I put my sister's t-shirts to use!


This Project cost me $0. And I mean 0. The t- shirts, from the sister, the frame from a home I was asked to go through and take whatever I could use and the Ric Rac from Andrew's Mother. Not one of my pennies was used to make this project! Can't help but LOVE that!

First, I cut 1/2 inch strips out of the t-shirts, I then made something like THIS to make the pom poms. (link shows how to make the pom poms. It's the method I used I didn't make mine as BIG though.) NOTE: When getting to the cutting stage do not be tempted to move anything. Just keep cutting around or you will have a bunch of 2 inch strips of fabric everywhere! I did that to the turquoise one, it took me SO much time to get it all back together!

I then cleaned up the frame, added the ric rac and stapled the pom poms where I wanted them. Done within 1 hour! And there you have it!

Monday, February 27, 2012

Fashion Scarf

I don't know what to call this scarf but I love the looks of it! I made this from 1 medium shirt from Downeast fitters. Thanks sister for getting rid of it for me to pick it up and make it into something else!

I made 6 circles by tracing a medium sized paper plate, then I cut around the inside of the circle about 1/2-1 inch in. Continue around until you reach the end, repeat on other circles That what makes the curly effect of the scarf. Because of the Spandex in this material It made the scarf LONG. So I cut each strip in half and tried them together with a scrap of the extra fabric from the leftover shirt. I added the hair clip as an embellishment. As a hint with the hair clip, The scarf is too thick to have the hair clip hold it all so I tried it with some twine and then had the hair clip hold on to that!
Here a closer look!

Saturday, February 18, 2012

Marble Necklace


I have been admiring this necklace for months! The original tutorial can be found over at kellyhicksdesign. I will provide pictures of my necklace and what I did to make this necklace and where I had issues. 

Items needed for this Necklace:
Material (I used Tulle which was left over from my sister's dress)
Marbles whatever color you want (thanks grandma!)
Needle and thread
Small beads for flower
Safety Pin
3 seed beads

I started with sewing  the material in a long tube making sure there was enough room to fit a Marble through it.
I then flipped the tube the right way. Which was the hardest part! It took me 3 tries before I figured out a good way to do it! That tulle doesn't like to be put up against itself!


After getting that right ways I put my first marble in to find the center and tried 2 knot on both sides.


I just kept working side to side knotting as I went. I noticed after doing a few that I wasn't tying them as tight as I wanted to. So I had to take knots out and almost start all the way over. See all the room in with the white on on the right? I'm a little OCD so I had to fix it!


Finally, I made my flower. I just cut squares out about the size I wanted and stacked them on top of each other, then sewed up the center to hold them together, then added the beads, and sewed it to the necklace in the location I liked. Here is the finished product!

I

Friday, February 17, 2012

Plate Tier Set

I have had these plate around my home for almost a year! I bought them at Walmart and thought they complemented each other. I used the E600 glue method, I didn't want to try and drill them and mess up the WHOLE project. And it's not like I could go and find more plates to replace the old ones... I also used wooden candlesticks for the center. I primed, painted and sprayed it with a sealant. In the end I think I did an ok job. I sadly got the middle plate WAY off. For the picture below I angle it just right so it wasn't completely obvious...

I love the colors. Orange, green, and yellow! Makes me wish for Spring and not have to wear a coat anymore!

Have you forgotten about the giveaway? Shame on you! Go here to enter!

Tuesday, February 14, 2012

Fabric button bracelet

I love the look of fabric buttons! I even went and bought some kits to make my own buttons but
I have one problem... I don't have scraps of fabric the match. well a few, but I wanted 4 or 5 different fabrics to make me a bracelet. So when I found these fabric brads I knew it was my way to get what I wanted!

So here is what I used to make this bracelet:

Fabric brads
Bracelet with disc settings – I bought mine at Hobby Lobby for $3.99 in the jewelery section(with coupon it was cheaper than that!)
E-6000 glue- My favorite!
and Wire cutters

I started by using the wire cutter to take the backs off the brads so they could fit in the disc settings. Then filled the disc settings with E-6000 and the bottom of the buttons. (not pictured, sorry glue works too fast! and my hands were covered in it!)

Then wait to dry, make sure the buttons are facing the right way and positioned the way you want them! My green with brown button got off somehow so now I have to wait til it comes off to fix it...


My favorite part of using the brads was not worrying  if the fabric goes together! I don't have confidence in that department. Always second guessing. Oh and before I forget I got this idea from themotherhuddle  
But she made her own buttons.

Remember to enter the giveaway go here!